Top 9 Ways to Fix Windows 10 Automatic Repair Loop
Top 9 Ways to Fix Windows 10 Automatic Repair Loop
Automatic Repair is a feature found on Windows PCs that allows users to automatically repair their computers. However, sometimes the feature does not work and your PC remains unrepaired. Sometimes, it also causes Windows 10 automatic repair loop that keeps your PC stuck on a single screen for a long time.
If that's the case with you, you might want to learn how you can fix Windows 10 repair loop on your computer. There are two kinds of loops that you might encounter and those are shown below. If you get any one of these loops, the steps below should help you get rid of the loop and fix the issue on your computer.
Case 1: Automatic Repair Windows couldn't load correctly in Windows 10
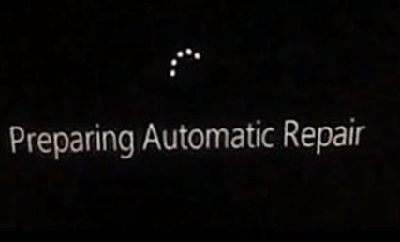
The Windows 10 preparing automatic repair loop usually occurs when Windows cannot finish preparing the automatic repair process. If you're stuck at this screen, you can't move forward unless you have fixed the issue.
Case 2: Windows 10 Automatic Repair couldn't repair your PC
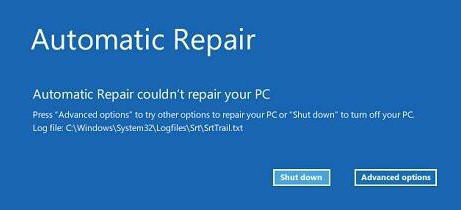
Sometimes it happens that the automatic repair cannot repair your PC due to various reasons. In this case, you will see an error message as shown above. If your PC is stuck at this step and doesn't let you move forward, read on to learn how to fix it.
Now that you know the kinds of loops, the following guide will offer Windows 10 automatic repair loop fix so you can fix the issue on your Windows 10 PC.
- Method 1. Set Hard Drive as the First Boot Device
- Method 2. Disable Automatic Restart
- Method 3. Refresh or Reset PC
- Method 4. Disable Early Launch Anti-Malware Protection
- Method 5. Delete the Problematic File
- Method 6. Disable Automatic Startup Repair
- Method 7. Restore Windows Registry
- Method 8. Repair MBR and Rebuild the BCD
- Method 9. Windows 10 Startup Repair Loop Stuck? Try Windows Boot Genius!
Method 1. Set Hard Drive as the First Boot Device
It may be the case that your PC is booting itself up from your secondary drive that could have issues in it. In that case, the first thing you'll want to check is if your main drive is set as the first boot device on your PC.
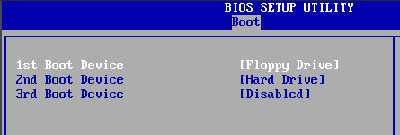
To do that, open the BIOS which can be done by pressing the F12 key when your PC is just booting up. When it opens, select your main drive as the first boot device. Then, reboot your PC and it should resolve the issue if it was the hard drive causing the issue.
Method 2. Disable Automatic Restart
Another way you could keep yourself from automatic repair loop is to disable the automatic restart function on your Windows 10 PC. It's quite easy to do that and the following steps show how:
● Press the Windows key on your keyboard to open the Start Menu and find and click on Task Scheduler.
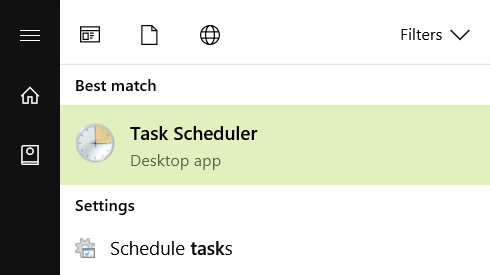
● When Task Scheduler opens, find and right-click on the task that says Reboot and select Disable. It will stop the task from executing on your PC.
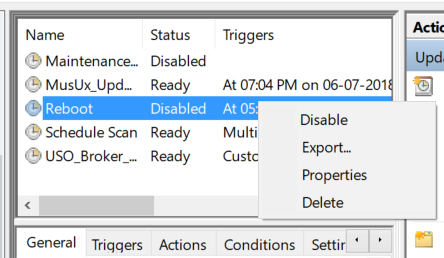
With the reboot task being disabled, your computer will not automatically restart thus preventing issues like automatic repair loop on your PC.
Method 3. Refresh or Reset PC
Sometimes it is worth refreshing or resetting your PC to repair the issues occurring on it. A quick way to do that is from the Troubleshoot menu which can be opened and operated as shown below.
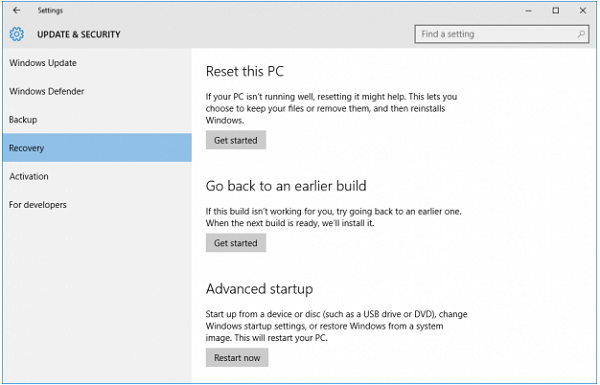
While you're on the loop screen, press and hold the Power button and you will be taken to the Troubleshoot menu. Choose Troubleshoot followed by Reset this PC or any other appropriate option. Follow the on-screen instructions and your PC will either be refreshed or reset to fix the issues.
Method 4. Disable Early Launch Anti-Malware Protection
Many users suggest that to fix the Windows 10 startup repair loop, one should disable the early launch anti-malware protection on your Windows 10 PC. It has helped many users get rid of the loop issue and it's worth giving it a try. The following shows how to do it:
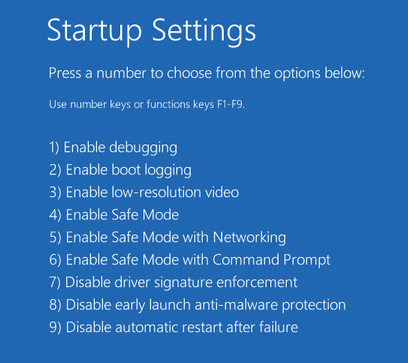
On the stuck screen, press and hold down the Power button to go to the repair menu. From there, choose Troubleshoot followed by Advanced Options and Startup Settings. Choose the option that says Disable early-launch anti-malware protection.
The feature should be disabled and your loop issue is likely resolved.
Method 5. Delete the Problematic File
It could be that a file is causing the issue and you should delete the problematic file as soon as you can to get your PC to perform normally. Finding and deleting the file can be done as shown in the steps below.
● From the Windows Boot Menu options, head to Troubleshoot > Advanced Options > Command Prompt and type in the following command and hit Enter.
C: cd Windows\System32\LogFiles\Srt. SrtTrail.txt
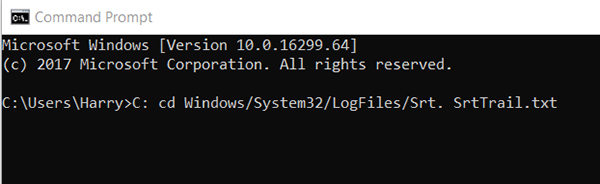
● If you find a file that says next to it that it is corrupt, delete it using the Del command from the command prompt window.
Del filename.txt
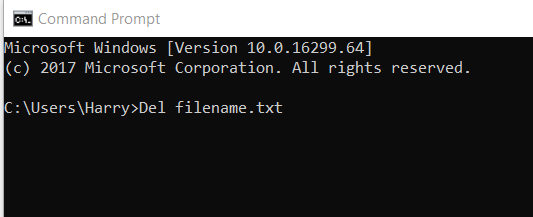
The problematic file should now be deleted from your PC and your issue should be resolved.
Method 6. Disable Automatic Startup Repair
One of the best ways to get rid of an issue is to just disable the utility where the issue is occurring. In this case, you can disable the automatic startup repair utility and so you won't face the issue ever again. Here's how to do it on your PC:
From the Boot Menu options, choose Troubleshoot > Advanced Options > Command Prompt and enter in the following command and hit Enter.
bcdedit /set {default} recoveryenabled No
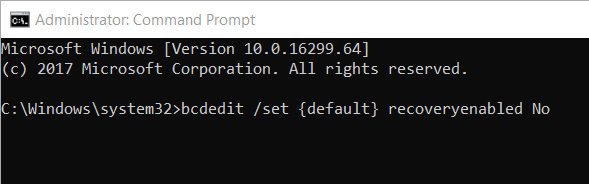
It should disable the automatic startup repair function for you on your PC.
Method 7. Restore Windows Registry
Windows Registry is an essential tool for your PC to properly function and if there are any issues with it, you will likely face issues on your PC. The following shows how to restore working register on your PC.
From the Windows Boot Menu options, choose Troubleshoot > Advanced Options > Command Prompt and enter in the following command and press Enter.
copy c:windowssystem32configRegBack* c:windowssystem32config
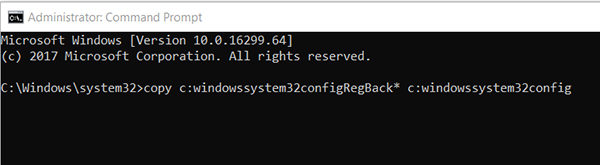
In case it asks you to overwrite files, enter All and hit the Enter key. That's all there is to restoring Windows registry. Your loop issue should likely be resolved now.
Method 8. Repair MBR and Rebuild the BCD
If the master boot record or boot configuration data files are corrupt, you will face issues like shown above on your PC. There is actually an easy way to fix these files on a PC and the below steps should let you do that.
In the Windows Boot Menu options, go to Troubleshoot > Advanced Options > Command Prompt and enter in below commands one by one hitting Enter after each.
bootrec.exe /rebuildbcd
bootrec.exe /fixmbr
bootrec.exe /fixboot
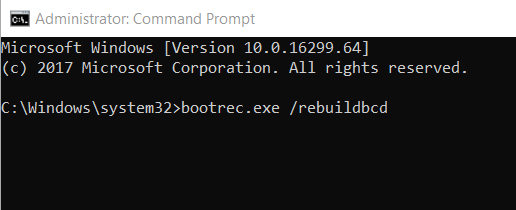
These should have fixed the MBR and BCD files on your PC and you can reboot your PC to see it for yourself.
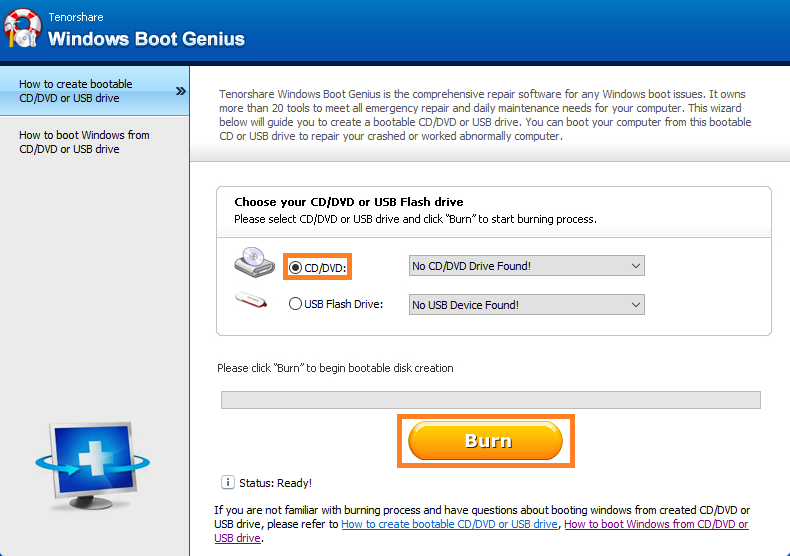
Method 9. Windows 10 Startup Repair Loop Stuck? Try Windows Boot Genius!
Lastly, if none of the methods mentioned above work for you, you may want to give a try to a third-party tool called Windows Boot Genius. . It's a nice little utility that helps users like you to fix many Windows boot issues on your computer.
The following shows in brief how to use the tool to repair the startup repair loop issue on your PC:
● Download and launch the tool on your PC. Insert a blank CD/DVD/USB drive to your disc drive and choose it from the dropdown menu in the tool. Click on the Burn option to begin burning the program onto your disc.
● Boot your PC from the bootable media and let the tool launch. When it launches, select Windows Rescue from the top menu bar and select an appropriate task from the left panel.
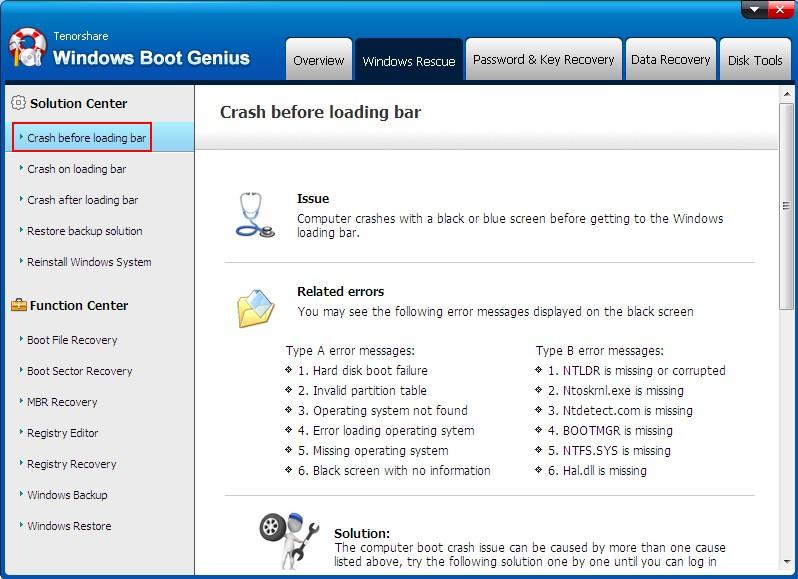
The tool should guide and help you fix the issue on your Windows 10 PC.
We hope the above guide helps you fix the Windows 10 automatic repair loop. With all these methods at your disposal, you'll certainly be able to get rid of the issue from your computer. And if nothing works, Windows Boot Genius will help you out.
- Related Articles
- How to Reset Windows 10 Password When It Is Forgotten
- how to reset password window 7 with usb
- how to reset administrator password in windows 8.1
