2 Easy Ways to Add, Remove or Change A Drive Letter in Windows 10
How to Add, Remove, or Change a Drive Letter in Windows 10 Using Two Methods
By default, your Windows 10 operating system automatically assigns a unique letter to each drive on your computer. The first two letters of the alphabet are reserved for floppy drives and the letter C is for your Windows installation disk. Apart from these, if you would like to perform the Windows 10 change drive letter function to add a letter, or remove a letter, here's how you do it.
The following guide teaches two ways to change drive letter Windows 10. It also shows how you can add and remove a drive letter on your PC. Let's check it out.
- Part 1. Add, Remove or Change a Windows 10 Drive Letter in Disk Management
- Part 2. Add, Remove or Change a Windows 10 Drive Letter Using Command Line
- Extra Tip: How to Hide Drive Letter in Windows 10?
Part 1. Add, Remove or Change a Windows 10 Drive Letter in Disk Management
Disk Management is a utility found on Windows computers that allows users to manage various tasks related to disks on your computers. The utility lets you view your disks, format them, shrink them, and even delete them from your PC.
The utility can add, remove and change a drive letter and the following is how you can use it for this purpose on your PC.
1. Add or Change a Windows 10 Drive Letter in Disk Management
In this section, you will learn how you can add or change the letter of a drive located on your PC. This allows you to use any of the unused letters for your drive but make sure to only use the unreserved ones so as not to get any errors.
Here's how to assign a drive letter Windows 10:
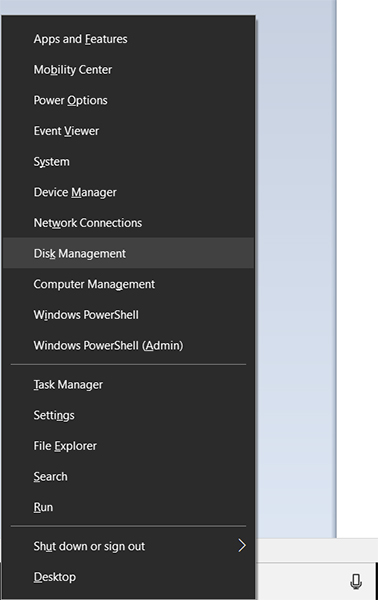
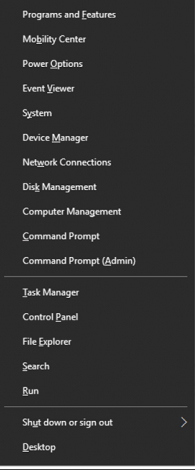
Step 1: Press the Windows + X keys on your keyboard and a menu will appear. Click on Disk Management in the menu and the utility will launch.
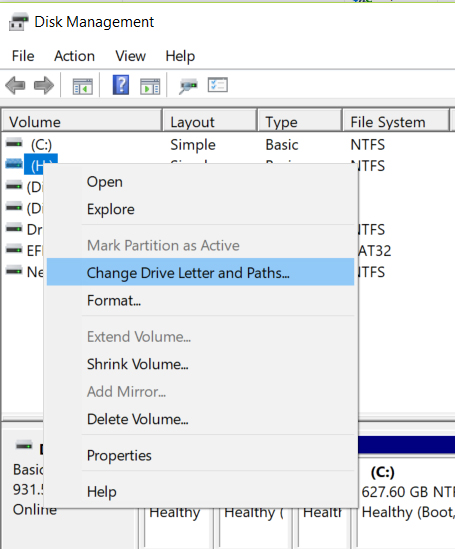
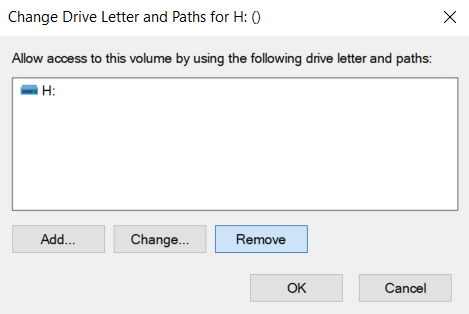
Step 2: When the utility launches, find and right-click on the disk whose letter you want to change. Select Change Drive Letter and Paths from the context menu.
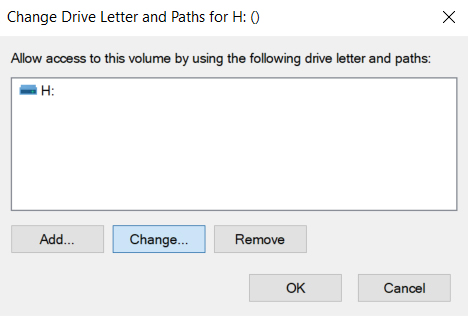
Step 3: On the screen that follows, click on the button that says Change to change the drive letter.
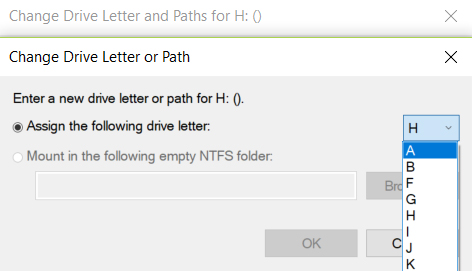
Step 4: On the following screen, next to where it says Assign the following drive letter you will find a dropdown menu. Choose the new letter from the menu and click on OK to save the changes.
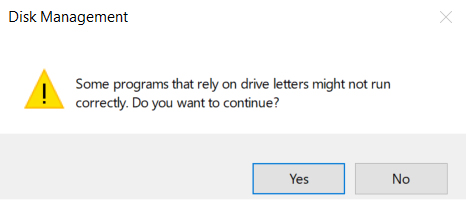
Step 5: A prompt will appear on your screen where you need to click on Yes to allow the procedure to happen.
Your selected drive will now have a new letter chosen by you in the Disk Management utility. So that's how to change drive letter Windows 10 using a built-in utility on your computer.
2. Remove a Windows 10 Drive Letter in Disk Management
When you remove the letter of a disk drive from your computer, you are hiding the drive from appearing in This PC on your computer. The drive will not show up anywhere nor will it be used by any apps on your computer.
With that in mind, let's see how to remove the letter of a drive in Disk Management on a Windows 10 PC:
Step 1: Press the Windows + X key and choose Disk Management from the menu that appears on your screen.
Step 2: When Disk Management opens, right-click on the drive you want to remove the letter for and select Change Drive Letter and Paths option.
Step 3: On the next screen, click on the button that says Remove to remove the drive letter.
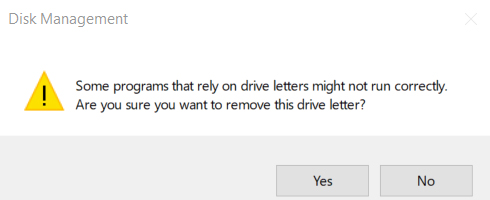
Step 4: A prompt will appear telling you that some of the apps won't work if you remove the drive letter. Click on Yes and it will let you move forward.
There you go. The drive letter has been successfully removed and your drive will not show up in your file explorer.
Part 2. Add, Remove or Change a Windows 10 Drive Letter Using Command Line
Are you not a huge fan of using GUI to accomplish tasks? No worries, the above task can be done using a command prompt window as well and the following shows how to do the change drive letter CMD operation on your PC.
There's a command that you can use in a command prompt session to assign and change drive letters for your PC. The following shows how you do it on your computer.
Step 1: Press the Windows + X key and choose Command Prompt (Admin) to open a command prompt window on your PC.
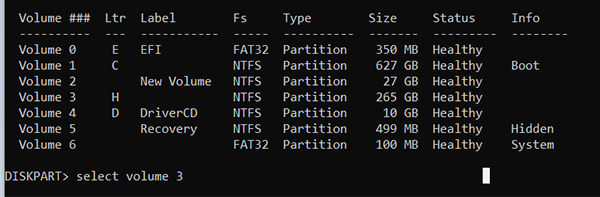
Step 2: In the command prompt window, type in list volume to see all of your drives. Make a note of the volume number you want to change the letter for.

Step 3: Type in the following command replacing vol_num with your volume number.
select volume vol_num
Step 4: Now that your volume has been selected, execute the following command changing M with your chosen drive letter to change your current drive letter.
assign letter=M

If the chosen drive letter is available, it should instantly be assigned to your selected volume. So that was how to change drive letter in Windows 10 using command line.
Extra Tip: How to Hide Drive Letter in Windows 10?
One more thing you can do with the drives on your PC is that you can hide their letters from appearing on your computer. This doesn't remove or assign a letter but just hides the letter on your PC. The following is how you do it.
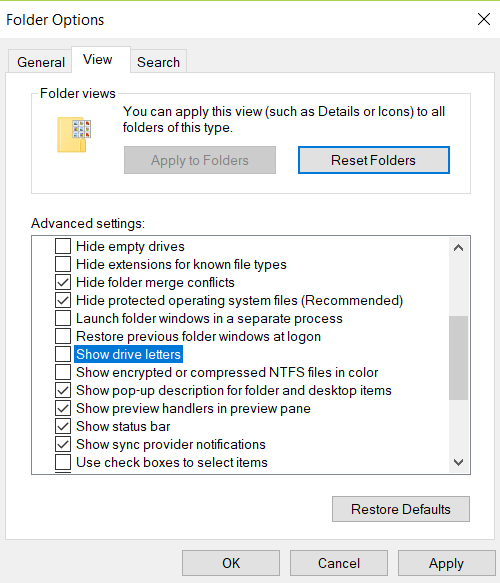
Open File Explorer and press the Alt + V keyboard shortcut. Then, press Y followed by O and Folder Options dialog box will appear. Head to the View tab and uncheck the option that says Show drive letters. Click on OK to save changes. The drive letter should now be hidden on your PC.
Another useful tip you might want to learn is how you can get access to your Windows account when you have forgotten the password. There's a software called Windows Password Keythat allows users to recover lost passwords on your computer. You can use it to recover the password for your account and then log-in to your account.
We hope you find the above solutions on how to change drive letter Windows 10 to be easy and efficient to follow on your Windows 10 PCs. Also, we hope you like the 4WinKey tool that lets users recover passwords for your accounts.
- Reset/Remove Windows admin and other user password for local/domain account.
- Create a new local/domain admin account to unlock your computer.
- Change your Microsoft account password offline.
- Fully support Windows 10/8.1/8/7/Vista/XP, Windows Server 2012 (R2)/2008 (R2)/2003 (R2).
- Related Articles
- How to Disable Windows 10 Fast Startup
- Windows 10 Keeps Asking for Login User Password, How to Fix It
- Windows 10 Password is Incorrect, How to Fix it
