Top 6 Ways to Enable and Disable Use On-Screen Keyboard in Windows 10
Top 6 Ways to Enable and Disable Use On-Screen Keyboard in Windows 10
If you are tired of using the physical keyboard or you want to try something on your screen to type things in your Windows 10 PC, then On Screen Keyboard is your solution. You can use this virtual keyboard instead of the physical keyboard if it’s necessary. If you are using Windows 10 on a touchscreen device than you can use this keyboard via touching in the display of your device. Otherwise you can use this keyboard via mouse or any other pointing device. In 6 easy and step by step guideline, this article will make you an expert in opening Windows 10 On Screen Keyboard.
Way 1: Enable and Disable Windows 10 On Screen Keyboard Via PC Settings
Way 2: Open On Screen Keyboard from Run Command Box
Way 3: Open On Screen Keyboard via Command Prompt
Way 4: Open On Screen Keyboard via Control Panel
Way 5: Create an On-Screen Keyboard Shortcut in Windows 10
Way 6: Add On-Screen Keyboard to Taskbar in Windows 10
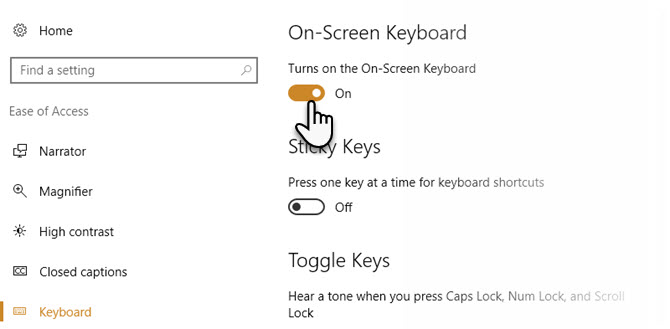
Way 1: Enable and Disable Windows 10 On Screen Keyboard Via PC Settings
You can easily enable and disable Windows 10 On Screen Keyboard via PC settings. It’s a very easy process. Here is how to do it –
Enable:
1. Go to “Start” option or click on the “Windows” button from the bottom left corner of your display.
2. Now choose “Ease of Access” option and then go to “Keyboard”.
3. Finally you need to toggle the slider under On Screen Keyboard option. You’ll see an On Screen Keyboard opened on the display of your PC.
Disable:
1. Just like before, go to “Start” option or click on the “Windows” button from the bottom left corner of your display.
2. Now choose “Ease of Access” option and then go to “Keyboard”.
3. Finally you need to toggle the slider under On Screen Keyboard option to disable On Screen Keyboard on Windows 10.

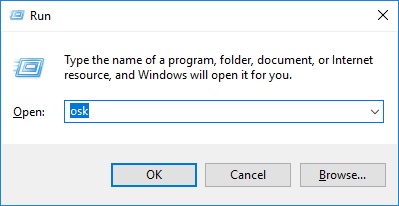
Way 2: Open On Screen Keyboard from Run Command Box
On Screen Keyboard can easily be opened from Run Command Box. Here is how to do it:
1. First you need to press “Windows+R” button in your keyboard. This will instantly open Run command box in your PC.
2. Now type in “osk” and press “Enter” on your keyboard. The On Screen Keyboard will pop up immediately in front of you.
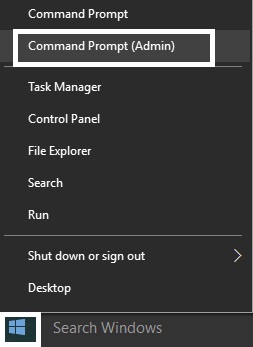
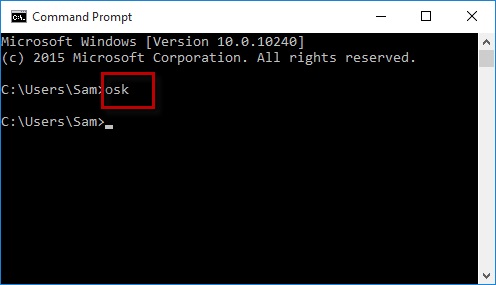
Way 3: Open On Screen Keyboard via Command Prompt
You can easily get On Screen Keyboard on Windows 10 via Command Prompt option. Here is how to do it:
1. Press “Windows+X” button in your keyboard and choose “Command Prompt (Admin)” from Quick Access Menu.
2.Now type in “osk” and press “Enter” button on your keyboard. On Screen Keyboard will open instantly.
Way 4: Open On Screen Keyboard via Control Panel
Opening On Screen Keyboard in Windows 10 via Control Panel is easy if you follow this guideline. Here is how to do it:
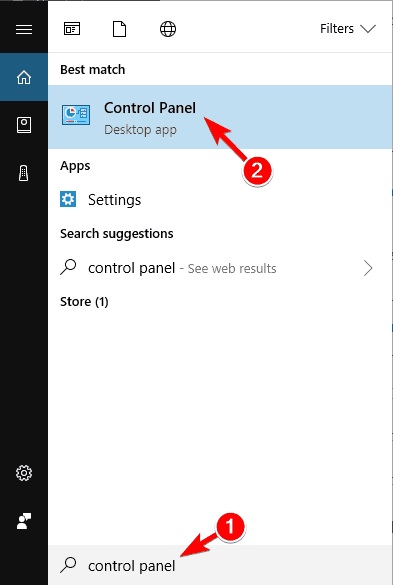
1. You need to open Control Panel at first. Click on the “Windows” button and search for “Control Panel” on the search box. Now select Control Panel from the list of results. You can also press the “Windows+R” button in your keyboard to open Quick Access menu and then select Control Panel.
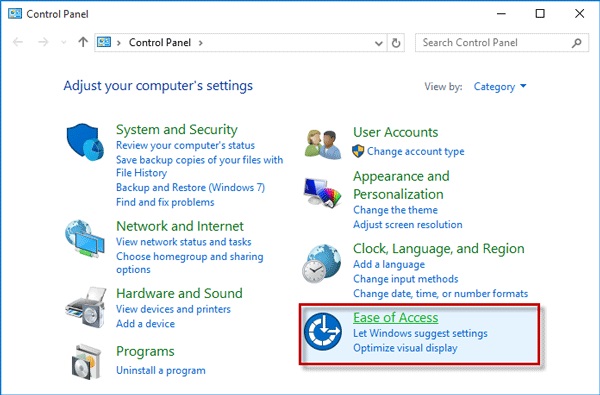
2. Now click on the “Ease of Access” button and then click on “Ease of Access Center” on the next page.
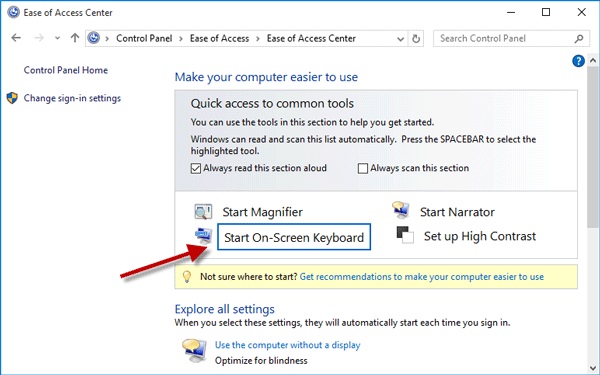
3. Finally click on the “Start On Screen Keyboard” option and access On Screen Keyboard in Windows 10.
Way 5: Create an On-Screen Keyboard Shortcut in Windows 10
If you don’t know how to get On Screen Keyboard in Windows 10 then this step is perfect for you. You can create an On Screen Keyboard shortcut in your Windows 10 desktop and access it anytime you want. Here is how to do it:
1. First right click on the blank area of your desktop. Go to “New” and then choose “Shortcut” from the options.
2. Now a shortcut creator window will appear and type in “osk” in the empty box. Now click on the “Next button.
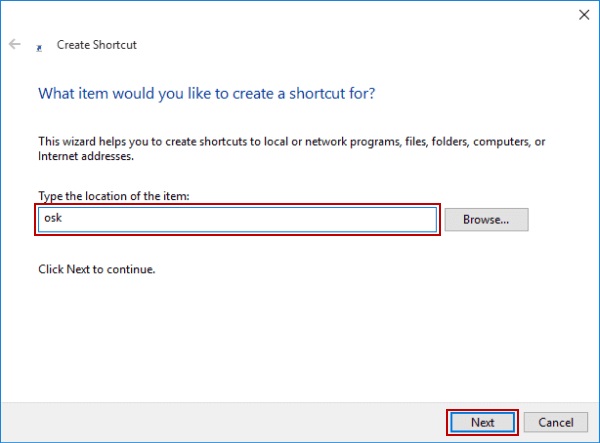
3. Now name your shortcut anything that is suitable for you like below image and then click on the finish button. This will create a shortcut of On Screen keyboard in your Windows 10 PC.

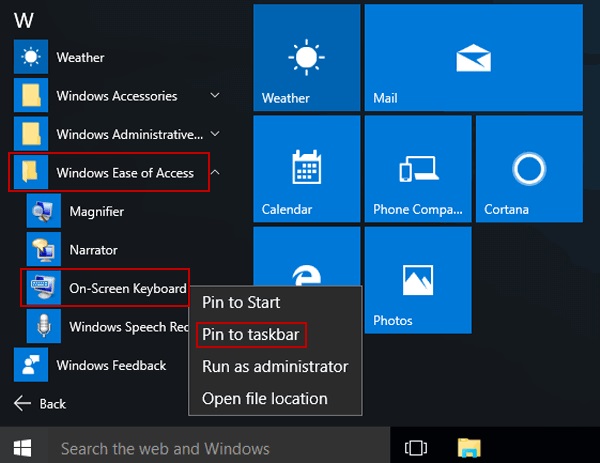
Way 6: Add On-Screen Keyboard to Taskbar in Windows 10
Adding On Screen Keyboard to taskbar in Windows 10, can help you access this tool anytime you want. Here is how to do it easily:
1. Click on the Windows button in the bottom left corner of your desktop to access the “Start” menu.
2. Now you need to choose “All Apps” and open “Windows Ease of Access” option. In the end, right click on the “On Screen Keyboard” option and choose “Pin to taskbar” option from the list.
Now you really know how to get On Screen Keyboard in windows 10 easily. Each and every single way from these 6 great ways can be really helpful for you. Sometimes we lose our Windows 10 password and it becomes very tough to recover the password. But with the help of 4WinKey, you can easily recover your lost Windows 10 password in no time. So start using this tool for any kind of password related issue in your Windows 10 PC.
- Related Articles
- How to Enable and Utilize System Restore on Windows 10
- 5 Methods to Resolve the Windows 10 Boot Failure Issue
- How to Enable Bluetooth in Windows 10
